Wednesday, June 27, 2018

Lemon Pepper
Roasted Asparagus

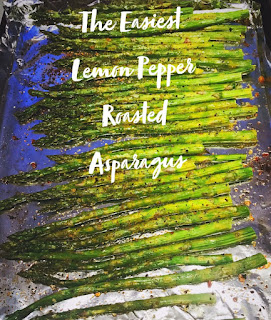
If you're like me, you understand how difficult it can be to get the perfectly cooked asparagus.  I've tried making it grilled, sautéed, and baked at various temperatures, but more often than not it comes out too soggy or overcooked.  

I finally found the easiest way to make it that takes under 10 minutes and comes out perfect every time! Also, it only has 4 ingredients.  Doesn't get much better than that, right?

Another bonus about this asparagus is it is healthy and salt-free! 

Ingredients

  • 1 bunch of asparagus (about 1/2 lb)
  • 1 tablespoon olive oil
  • 1 tablespoon Mrs. Dash lemon pepper seasoning
  • 1 tsp black pepper

Instructions

  1. Preheat oven to 425℉.
  2. Cut the wooden-like ends off of the asparagus. 
  3. Line a baking sheet with aluminum foil and place asparagus on the pan.
  4. Drizzle olive oil over the asparagus.  I usually use my hands to turn the asparagus in order to ensure they are completely covered in oil. 
  5. Sprinkle lemon pepper seasoning and black pepper over the top of the asparagus, again turning to make sure it is completely covered.
  6. Bake for 7-8 minutes, or until the asparagus can be easily penetrated with a fork. 
  7. Enjoy!
Like I said, this is probably the easiest recipe there is and takes almost no time at all. It pairs well with just about anything, which is another added bonus. Enjoy! 

The BEST Homemade
 Chicken Tenders

Alright, if you are looking for a delicious and easy chicken tenders recipe, you've come to the right place! These are by far the best chicken tenders I've ever made- I'm talking better than a restaurant! 

These were super easy to make, and chances are you already have all the ingredients you'll need in your pantry! 

The most important part of this recipe is to cut against the grain.  This will ensure the chicken is tender and easier to bite off (or cut).  Make sure you don't skip this step!

I served the chicken tenders with mashed potatoes (see Best Ever Mashed Potatoes) and lemon pepper-roasted asparagus.  Delicious!

Ingredients

  • 3 boneless skinless chicken breasts
  • 3 cups vegetable oil
  • 1 cup milk
  • 1 1/2 cups of bread crumbs 
  • 1 cup flour
  • 2 eggs
  • 2 tsp Lowry's seasoned salt
  • 1 tbsp black pepper
  • 3 tsp garlic salt
  • 2 tsp onion powder
  • 1 Hidden Valley ranch seasoning packet
Instructions
  1. Slice chicken breasts into strips, cutting AGAINST the grain.  You can cut strips to any size you wish, but just make sure to cut against the grain! 
  2. In a large bowl, combine milk, half of the ranch packet, 1 tsp black pepper, 1 tsp garlic salt, and 1 tsp onion powder.  Place chicken tenders in the bowl, making sure both sides are covered in the mixture.  Refrigerate for 20-30 minutes to allow the chicken to marinate.
  3. In a small bowl, whisk together eggs and remainder of the milk mixture from the marinade. 
  4. In a large bowl, combine flour, bread crumbs, the remainder of the ranch packet, Lowry's, 2 tsp black pepper, 2 tsp garlic salt, and 1 tsp onion powder to create the breading. 
  5. Heat oil in skillet for about 5 minutes or until it just starts to bubble.
  6. While the oil is heating up, dip each chicken tender in the egg/milk mixture, ensuring the tender is completely covered.  Next, place the covered tender in the breading mixture, ensuring it is thoroughly covered.  I usually press it down on each side, and sprinkle extra on top to make sure the entire tender is covered.
  7. Once the oil is bubbling, use tongs to place each chicken tender in the skillet.  Let cook about 3-5 minutes, or until the bottom looks a deep golden-brown.  The cook time will vary depending on the size of the tender. 
  8. Using tongs, flip each tender and cook an additional 3-5 minutes or until done. Note: Cooked chicken should reach an internal temperature of 165℉.
  9. Remove from oil and place on a paper towel-lined plate to absorb the extra grease.
  10. Enjoy!! 

Monday, June 25, 2018

RECIPE
The Best Pan-Seared Steak
This recipe is one I’ve used before, and is a great way to prepare a steak if you don’t feel like grilling (or in our case.. if it is raining outside). One of the great things about this recipe is the steak can be eaten as a main dish by itself or sliced thinly to use for philly sandwiches, rice bowls, and just about anything else.

I love how tender and juicy the sirloin gets when it is cooked in a pan, I think it’s almost better than grilled!

In the recipe I’ve included about 20-30 minutes for marinating time, but if you don’t have time or would just like to skip this step, that is totally fine.  If you choose to skip the marination, make sure you don’t skip out on the worcestershire as it is a key component to the delicious smoky flavor!

Make sure to stand away from the pan when you are handling the steak, as the oil WILL splatter and if you’ve ever been splashed by hot oil before, you know how painful it is!

I served the steak with green beans, mashed potatoes (see best mashed potatoes) and garlic rolls.

 Ingredients
  • 2 sirloin steaks, at least 1 ½ inches thick
  • ½ cup extra virgin olive oil
  • 4 tablespoons of butter
  • 2 tablespoons worcestershire sauce
  • 3 tsp black pepper
  • 3 tsp garlic salt
  • 2 tsp parsley

Instructions

  1. Season raw sirloin with 1 tsp of black pepper on each side.
  2. Brush each side with worcestershire sauce, and refrigerate for 20-30 minutes to allow the steak to marinate.  Note: this step isn’t required, it just allows the sirloin time to soak up the juices and gives it a little more flavor.
  3. Pour olive oil into skillet and allow to heat up to about 300°F, or until it just starts to bubble.  This usually takes about 5 minutes.
  4. While the oil is heating up, melt butter in a small bowl.  Add garlic salt, 1 tsp parsley, and remaining black pepper.
  5. Brush butter mixture onto top of the sirloin.
  6. Using tongs, place sirloin in the hot skillet, buttered side down. NOTE: hold it away from you, as it will splatter!
  7. Let it cook on that side for 4-5 minutes, carefully lifting the steak just barely after about 2 minutes to allow more oil to flow under the steak.
  8. While the sirloin is cooking on the first side, brush the remaining butter mixture on top of it.
  9. After 4-5 minutes, carefully flip the steak using tongs, again holding it away from you because it will splatter.
  10. Let the steak cook for an additional 4-5 minutes in the oil, again lifting slightly after about 2 minutes to allow more oil to seep underneath.
  11. Remove from pan and enjoy!

Wednesday, June 20, 2018


Best Ever Mashed Potatoes
Mashed potatoes are my absolute favorite food, and I've tweaked my recipe many times trying to achieve potato perfection.  I think I've finally mastered them, because these potatoes always get tons of compliments!

One of my favorite things about these potatoes is you don't need to top them with gravy, which saves a big step in the preparation process.  If you are a gravy lover, then by all means go right ahead and toss some on there! 

The last time I made these, I didn't add the bacon bits and they were just as delicious (and a tad bit healthier). 
 Enjoy :)
Ready in 25 minutes
Serves 4-6 people as a side dish
Ingredients
  • 4-5 large russet potatoes
  • 4 oz cream cheese
  • ¼ cup sour cream
  • ½ cup shredded cheddar cheese
  • 4 strips of bacon
  • 4 tbsp butter
  • 2 tsp parsley
  • 1 tsp garlic salt
  • 2  tsp black pepper
  • 6 cups water
Instructions
  1. Preheat oven to 400 degrees
  2. Slice potatoes and cut into 1-1 ½" pieces.  Note: I use potatoes with the peel still on because I feel like it gives them more flavor.
  3. In a medium saucepan, bring the water to a boil and add potatoes. I like to add a little garlic salt to the water to give the potatoes more flavor.  Boil until soft enough to mash with a fork.
  4. While the potatoes are boiling, line a baking sheet with aluminum foil and place bacon strips on, evenly spaced.
  5. Bake the bacon for about 15-20 minutes until they reach the crispiness level you desire.  Place bacon strips on a paper towel lined plate to soak up the extra grease.
  6. Drain potatoes; do not rinse.  Return potatoes to pan and add butter.
  7. Using a masher or wooden spoon, mash potatoes until they reach the desired consistency.
  8. Add the cream cheese and sour cream, mixing thoroughly.
  9. Mix in the cheddar cheese, parsley, pepper, and garlic salt. Continue mixing until cheese is completely melted.
  10. Chop bacon into bits and add to potatoes.  Stir until they are mixed evenly.
  11. Serve and enjoy!

Tips


The best thing about these potatoes is that you don’t need to top with gravy, just a dab of butter will do!


Easy-Cheesy Tuna and Noodle Casserole


This is my all-time favorite go-to recipe for busy weeknights or when I’m in the mood for a hearty, delicious meal.  It is super easy and takes just 25 minutes to make. I probably make this dish 3-4 times per month, because it is one of those meals you just can't get sick of!


This recipe serves about 6-8 people, but my boyfriend and I make it for just the two of us and have leftovers for a few days! Sometimes I think the leftovers might be even better than when it is fresh out of the oven, so don't be afraid to have a little extra.


One tip for this recipe is to not skimp on the black pepper! It may seem like you are adding a lot, but I promise you it is worth it.  It is one of the main components of this recipe since it is the only seasoning used!


Note: I don’t have a picture right now, but the next time I make tuna and noodles I will be sure to snap a few pictures and add them to this recipe!


RECIPE
Easy-Cheesy Tuna and Noodle Casserole
Ready in 25 minutes
Serves 6-8 people

Ingredients

  • 1 box bowtie pasta
  • 2 cans of tuna
  • 1 family size cream of chicken soup
  • 1 (6 oz) bag of shredded colby jack cheese
  • 4 slices of colby jack cheese (optional)
  • 1 tsp garlic salt
  • Black pepper
  • 6 cups water


Instructions

1.     Preheat oven to 350 degrees

2.     In a medium saucepan, bring 6 cups of water to a boil. 

3.     Add pasta and garlic salt to boiling water.  Boil 11-13 minutes or until noodles are soft. Drain but do not rinse. Note: bowties take longer to boil than regular pasta, so ensure the noodles are completely soft.

4.     Return pasta to saucepan and add about half the can of cream of chicken soup.  Mix well, grinding pepper in as you stir.

5.     Drain both cans of tuna and add to the pasta mixture, stirring until mixed well. 

6.     Slowly add more cream of chicken until mixture reaches desired consistency.  (I usually end up using about ¾ of the can)

7.     Grease an 8”x 8” glass baking dish with cooking spray,  add about ½ of the pasta mixture to the dish

8.     Add 6-8 grinds of black pepper to cover the top of the pasta mixture

9.     Lay 4 slices of colby jack cheese to cover the pasta mixture entirely.  If you want to skip the slices, adding a layer of shredded colby jack instead will work.  Note: I like using cheese slices here because it creates a more consistent layer

10.  Add the remaining pasta mixture on top of the cheese layer

11.  Sprinkle with about 6 more grinds of black pepper on top of the pasta

12.  Cover the entire top of the casserole with shredded colby jack cheese.  Note: you don’t have to use the entire bag, just add as much as you’d like to achieve the desired cheesiness level.

13.  Bake uncovered for about 12-15 minutes. The bake time varies depending on your oven, so bake until the outer edges of the top layer just start to look golden-brown.

14.  Enjoy!!